Where was this hiding at?! Two massive gains in the application space in less than 24 hours. I guess I am learning quite quickly! And more importantly, looking for interactive solutions! Look at this beauty!

I remember when Apple first dropped ARM processors on their Macbook line. Lovely things like this were not even options! I installed an extension called Remote Explorer which allowed SSH access into the homepage LXC and a visual file directory explorer. I’ve been navigating through the terminal for a few years now – my old brain just disregarded solutions like PuTTY. But my workflow honestly didn’t require much visually until now.
Compliments of Techno Tim I’ve been blessed with a head start on configuring the YAML files for the homepage LXC. I went ahead and copied his over vice typing this all from scratch and digging through the configuration documentation for hours. Something tells me I will still be reading through it... for hours.

As you can see, the configuration files load up fine, but none of the APIs have been configured, I did change a few names in the services.yaml to match my homelab. You can see them above under the Proxmox links – and below in the services.yaml.

Which brings me to the exciting new thing I have encountered:
.env
What is this mysterious file, which seems to relate all my coveted username/password data to the APIs. Examples:
username:  "{{HOMEPAGE_VAR_PROXMOX_USER}}"
password:  "{{HOMEPAGE_VAR_PROXMOX_API_KEY}}"
Even the URLs have a string reference:
url: "{{HOMEPAGE_VAR_PROXMOX_URL}}"Below you can see the .env file which is the source of reference for the services.yaml. These are referred to as environmental variables.

You can see the many references to the original services.yaml provided by Techno Tim. Many of these service strings will be removed for my homepage. But the important part here is how do we secure the .env file – encryption? User permissions? All of the above?
RESEARCH TIME!
A few links of information!
https://stackoverflow.com/questions/60360298/is-it-secure-way-to-store-private-values-in-env-file
After an hour of looking into encryption methods and signing up for a Google Cloud account for usage of their Secret Manager I decided to take a break. I got lost on a major distraction. I am now curious how to use my $300 credit with Google Cloud.
After some more light reading (about an hour!) about API_KEYs I realized each of these had to be acquired from their perspective systems; then added to the .env file. As you can see below here is the add API key feature of Proxmox:

After generating a token and updating our .env file you may occasionally have to restart the container.
docker compose up -d --force-recreateor
docker compose down
docker compose up -d
Oh looky there! Proxmox has acknowledge the existence of the API token in the homepage YAMLs. Except it is not getting data from the nodes.

It appears you must uncheck the Privilege Separation box in the add token screen in Proxmox – as seen above.

Terrific! Except there is a final adjustment that must be made. For whatever reason the HOMEPAGE_VAR_PROXMOX_URL seemed to not be configured in the original YAML files for more than one node. Compliments of the glorious Visual Studio Code – I opened them in split screen and edited very simply with a 2, 3, and 4 at the end of each string.

You simply add your nodes IP address to the end of each of string in the .env file.
HOMEPAGE_VAR_PROXMOX_URL=
HOMEPAGE_VAR_PROXMOX_URL2=
HOMEPAGE_VAR_PROXMOX_URL3=
HOMEPAGE_VAR_PROXMOX_URL4=
If homepage doesn’t refresh immediately you can execute:
docker compose up -d --force-recreateAnd presto! One API token generated in Proxmox is effective for each node. How beautiful is that!

SLEEP BREAK!
UniFi Controller Widget
Ah, good morning! The Unifi Controller widget really snapped my brain in half! Probably because it was late – and your mind just needs a break sometimes.
I’ve looked it over many times and read through various GitHub discussions to make sense of it all my brain is currently not engaging this task – likely overcomplicating it. I’ve dug through the Site Manager API documentation – created an API key and changed the configuration in the YAML multiple times.
This is less of an homepage issue and more of a “IDK” what to put for username/password problem.
Configurations I’ve tried to to set on the two the environmental variables:
HOMEPAGE_VAR_UNIFI_NETWORK_USERNAME=
HOMEPAGE_VAR_UNIFI_NETWORK_PASSWORD=- Primary login username/password
- Primary login username/API key
- homepage/API key (based on suggestions from Discord)

This was the initial error I was getting. Nothing is configured in the services.yaml – throws the default API Error.
Using the Primary login username/API key I got hit with a AUTH LIMIT REACHED error. So perhaps one to many refreshes of that page.
API Error: HTTP Error 429
URL: https://192.168.1.1/proxy/network/api/stat/sites
Response Data:{"code":"AUTHENTICATION_FAILED_LIMIT_REACHED","message":"You've reached the login attempt limit","level":"debug"}
Ah, the joy! Now I have to check through the UDM Pro to see what was tripped – maybe my request is being blocked. However, what’s interesting is after I login, I can pull information from my browser using:
https://192.168.1.1/proxy/network/api/stat/sites
But the API is still not accepting the credentials I am attempting to use in the homepage services.yaml.
Solution found!
Reading through the other GitHub discussions I come across a post in the discussions mentioning a Local “Viewer” account for UniFi.

For whatever reason this seemed to be the fix. Creating another user on my UDM Pro with “view only” permissions and using those credentials in the YAML.
Synology Disk Station Widget
Switching over to the configuration of the Synology widget required a very similar process. Setup a new user, set view only permissions, except for whatever reason the instructions did not lead to success. And since I already wised up on the previous problem, I went straight to the GitHub discussions and found the solution.

You have to “Allow” traffic for the user to Download Station and DSM for the widget to function correctly. Then of course update the variables below from the .env file with the correct IP address, username and password you created for the new User on your Synology DiskStation Manager and save it.
HOMEPAGE_VAR_SYNOLOGY_URL=https://IPADDRESS:5001
HOMEPAGE_VAR_SYNOLOGY_USERNAME=
HOMEPAGE_VAR_SYNOLOGY_PASSWORD=
How interesting! Visual Code Studio dropped the SSH connection!
Seems while working with the YAML configurations the LXC running homepage went on a memory chomping spree! SSH crashed and when I checked on it in Proxmox the container was at 98% memory. I had to increase from 2GB to 3GB. But as I watched it kept chomping away to 3GB… then to 4GB. I closed out my browser and restart Visual Code Studio and alas! The memory was free!!

Back to the final widget! Plex! As you can see below, it has come along quite nicely. Only 12 hours or so of research and sweat!

Plex Widget
Let’s see how nicely this one goes! On the hompage site we have a nice URL to Plexopedia for requesting the API key.

Reading through the information I jumped at the first thing I seen – attempted to SSH into the Plex server on port 32400, only to get rejected. I wanted to get to the location listed below:

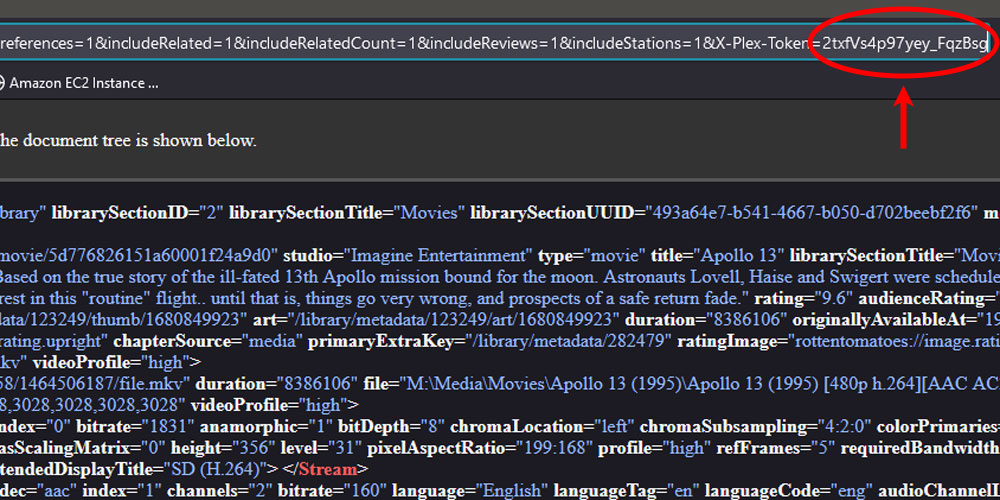
I could dig into that SSH problem, but thankfully I chose to read further into the article. The token can be found in the browser.
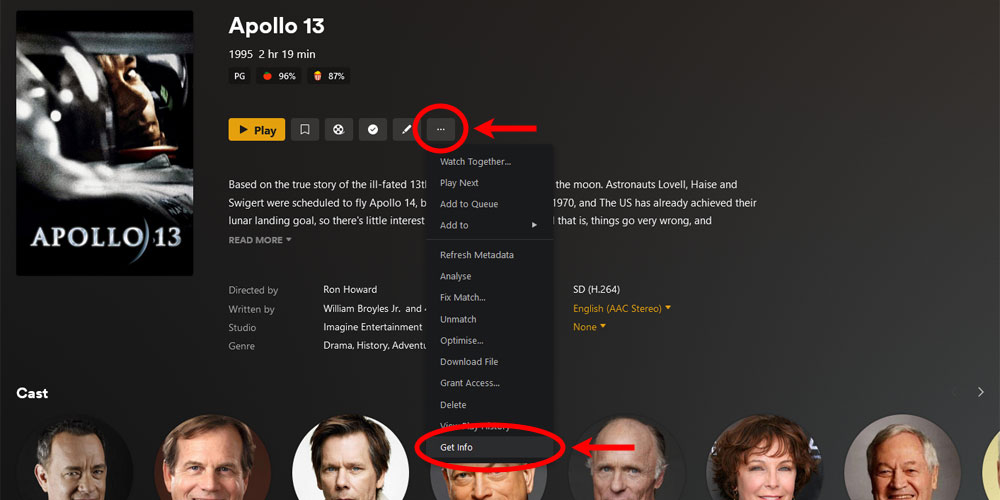
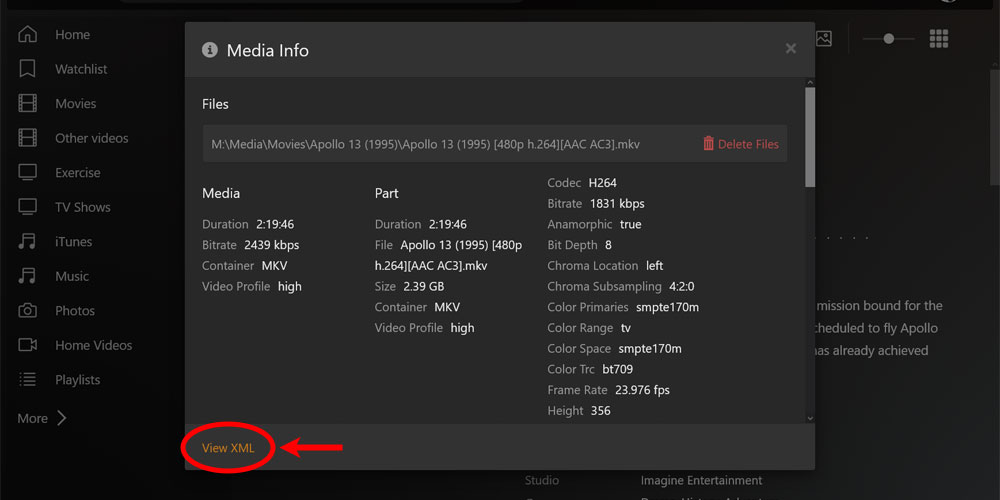
Visual steps to the Plex XML data page (get your API Key!)


The (mostly) final product!

You know it looks really nice! Configuring this was such an exciting project. I have yet to even begin the customization features in the settings.yaml:

But for now I am content with this being up and running – and I really want to get to investigating other containers… specifically wallabag!!
Leave a Reply